Quickstart
Start accepting Crypto Payments before your coffee gets cold ☕
API Integration Flow
This docs guides you through the process of integrating the Payment API to accept cryptocurrency payments within your application or website. The integration process involves four key steps, which are outlined in this tutorial.
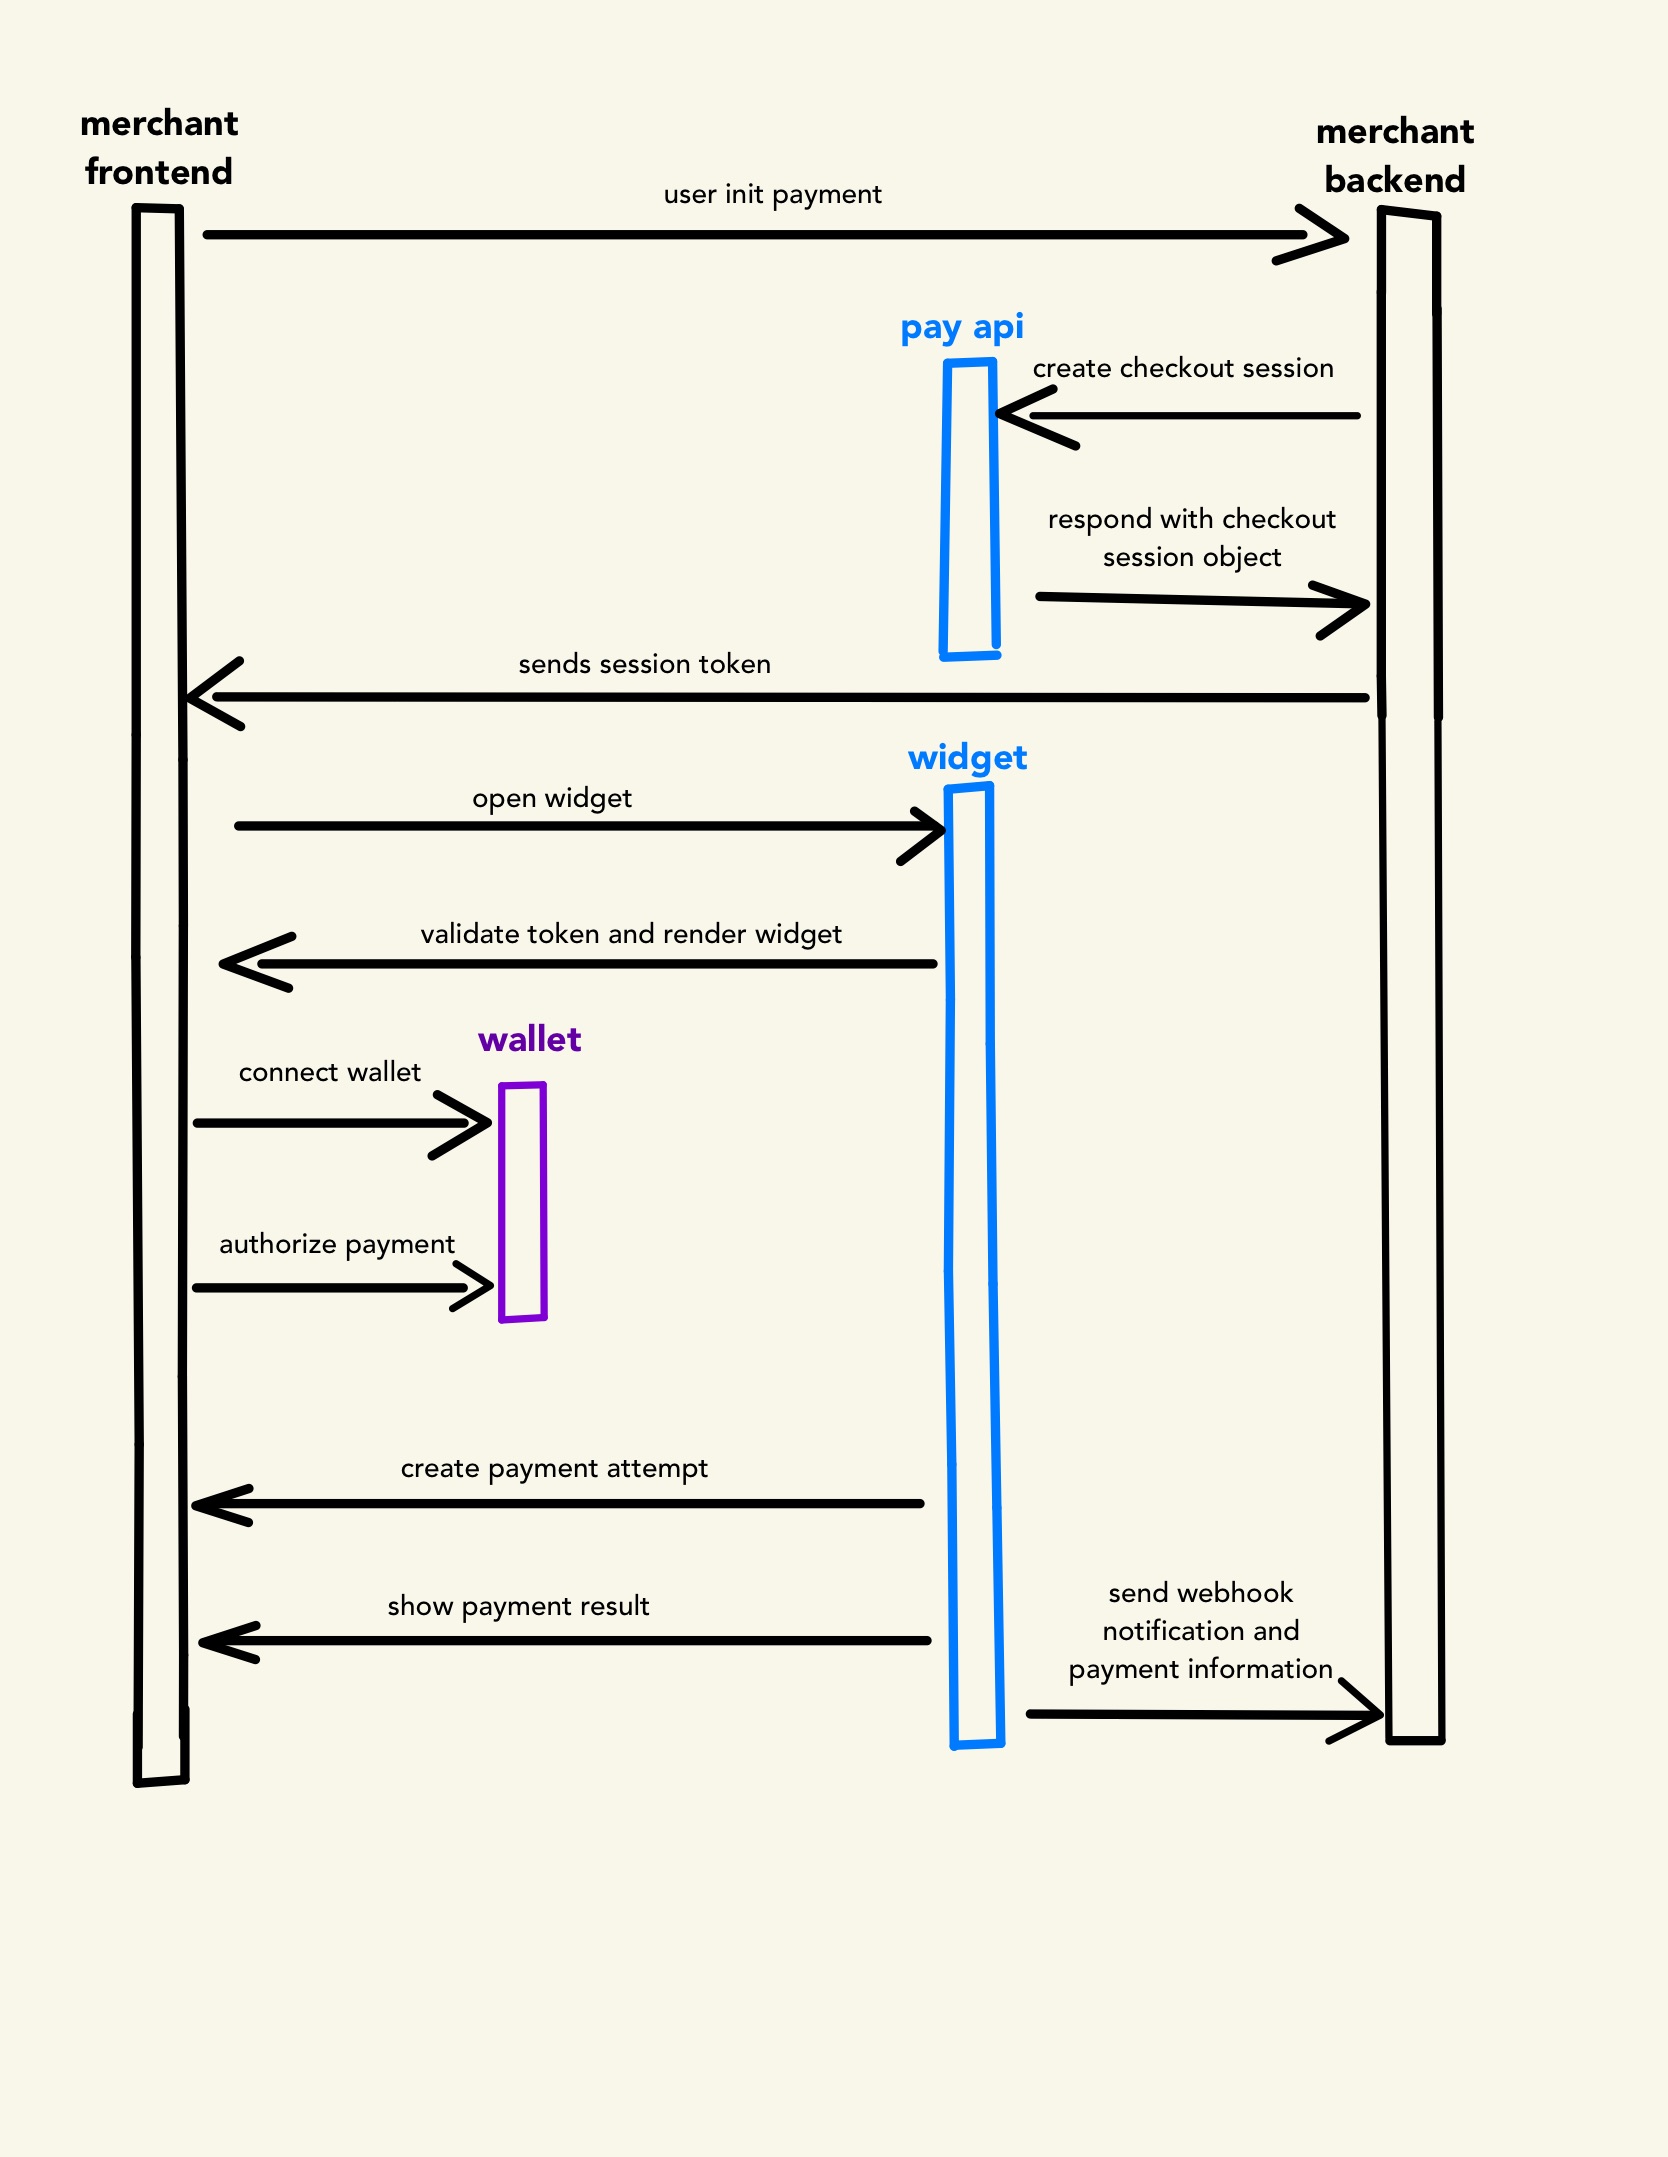 Figure: Payment Flow Diagram - Overview of the API integration process
Step 1: Get Your API Keys
All API requests require authentication using your account credentials (API_KEY). You'll work with two types of keys:
API_KEY: Used for backend operationsPUBLIC_KEY: Used for client-side integration (starts withtest_orlive_)
Use test keys while developing. Switch to live_ keys after testing.
If an interaction with the API does not include your API_KEY or includes an incorrect API_KEY, the API will return an error.
- Log into your Dashboard
- Navigate to Developers → API Keys
- Copy keys from the Test or Live Mode section
Step 2: Create a Session
Using your API_KEY, create a Session from your backend with the amount and currency of the payment. Always create the Session from your backend, or a malicious user could alter any of those fields.
Never create sessions directly from client-side code to prevent amount tampering.
Example Request (1.00 USD):
 curl -X POST https://pay.buidling.com/v1/sessions \
  -- header 'x-api-key: API_KEY' \
  -- header 'Content-Type: application/json' \
  --data-raw '{
    "amount=100" \
    "currency=usd"
  }'
The API represents currencies in its smallest possible units with no decimals (as an integer). That means that an amount of USD 3.14 gets represented as 314.
Understanding the Response:
{
  "data": {
    "createCheckoutSession": {
      "id": "MCYykMzlmlTMRcQWSHRK",
      "createdAt": "2025-03-07T21:24:38.197Z",
      "updatedAt": "2025-03-07T21:24:38.197Z",
      "expiresAt": "2025-03-08T21:24:38.197Z", // 24h validity
      "mode": "TEST", // Depends on the mode you are
      "amount": 1,
      "currency": "USD",
      "status": "CREATED", // Track payment lifecycle
      "sessionToken": "6szjmsUF2TUXCqRV6bwaFjxViCPJdYCG8dVqNzj6ojym"
    }
  }
}
Step 3: Open the Widget
Embed the payment interface using the sessionToken from Step 2 and your PUBLIC_KEY:
Your PUBLIC_KEY and checkout session must use the same environment mode
- JavaScript (ESM)
- Plain HTML
- Node (NPM)
import { getBuidling } from '@buidling/widget';

// You can read more about the parameters below
const options = {
sessionToken: 'SESSION_TOKEN',
publicKey: 'YOUR_PUBLIC_KEY',
onSuccess: (data) => console.log("✅ success", data),
onExit: (reason) => console.log("👋 exit", reason),
onEvent: (name, meta) => console.log("📡 event", name, meta),
};

const main = async () => {
const Buidling = await getBuidling();
const widget = Buidling.create(options);
widget.open();
};

main();
<script src="https://js.buidling.com/v1/" defer></script>

<script>
  window.onload = () => {
    const widget = Buidling.create({
      sessionToken: 'SESSION_TOKEN',
      publicKey: 'YOUR_PUBLIC_KEY',
      onSuccess: (data) => console.log('✅ success', data),
      onExit: (reason) => console.log('👋 exit', reason),
      onEvent: (name, meta) => console.log('📡 event', name, meta),
    });

    widget.open();
  };
</script>
import { create as createWidget } from '@buidling/widget';

const widget = createWidget({
sessionToken: 'SESSION_TOKEN',
publicKey: 'YOUR_PUBLIC_KEY',
onSuccess: (data) => console.log('✅ success', data),
onExit: (reason) => console.log('👋 exit', reason),
onEvent: (name, meta) => console.log('📡 event', name, meta),
});

widget.open();
Properly utilize widget callbacks and events by limiting their scope to frontend flow management only. While onSuccess, onExit, and onEvent handlers can control UI states and collect usage metrics, never depend on them for critical payment confirmation. These client-side triggers should merely surface interface interactions - browser closures and malicious actors can compromise their reliability. Always validate Checkout Session status and Payment Intent outcomes through backend webhook verification to ensure transaction integrity
Step 3.1: Methods of the Widget object
Once a widget object is created, you can use its methods to interact with it. The available methods are open, hide, and destroy.
| Method | Description |
|---|---|
widget.open() | Opens the widget overlay whenever it is called. |
widget.hide() | Hides the widget from the user. It does not destroy the instance; you can call open() again to show it. |
widget.destroy() | Removes the widget instance from your application. To show it again after calling destroy(), create a new instance with Buidling.create(). |
Step 4: Configure Webhooks for Payment Events
Our system automatically sends real-time notifications (sends a POST request) to your webhookUrl (Need help with webhook setup?) for these critical payment lifecycle events:
| Event Type | Trigger Condition | Your Required Action (Recommended) |
|---|---|---|
checkout_session.finished | Payment successfully completed | Fulfill order, update database, etc |
checkout_session.expired | Session timed out (24h window) | Release reserved inventory |
Unlike client-side callbacks, webhooks:
- ✅ Guarantee delivery - Even if users close their browser/app
- ✅ Prevent fraud - Avoid malicious clients spoofing payment statuses
- ✅ Enable automation - Trigger backend workflows (emails, shipping, etc.)
Webhook POST payload example:
{
  "type": "checkout_session.finished",
  "transaction_hash": "tx_hash12231fyc", // the transaction hash or signature
  "sessionId": "8szjmsUF2TUXCqRVybPaFjxViCPJdYCG8dVqNzj6ojym",
  "amount": 1,
  "currency": "USD",
  "timestamp": "2025-03-07T21:24:38.197Z
}
- Token Security: Never expose your
SECRET_KEYin client-side code - Error Handling: Implement network error fallbacks and retries